Plex Activity Rainmeter Skin
If you run a Plex server, you probably live inside Tautulli. It is the gold standard for monitoring streams, history, and transcoding stats. But I found myself constantly keeping a browser tab open on my second monitor just to glance at current activity.
That felt inefficient. I wanted a Plex HUD for my desktop, not just another web page. After searching for local monitoring solutions and finding most Rainmeter skins for Plex were broken or abandoned, I decided to build my own: the Plex Activity Rainmeter Skin.
The Philosophy
The goal was simple: Information at a glance, invisibility when idle.
I didn't want a static block taking up screen real estate. This Rainmeter plex monitor uses a dynamic rendering engine (powered by a Lua script) that resizes the background based on how many people are watching.
- 0 Streams: It shrinks to a tiny status bar.
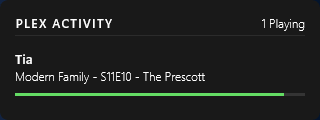
- 3 Streams: It expands to show details for all three active sessions.
- Transcoding: The progress bar shifts from Green to Orange instantly, giving you a visual cue of server load.
Installation
This requires Rainmeter and a running instance of Tautulli. The skin doesn't talk to Plex directly; it talks to Tautulli's API to ensure the data is accurate, rich, and includes transcoding details.
Step 1: Download
Grab the latest .rmskin package from the GitHub releases page. It includes all necessary resources and fonts.
Step 2: Install
Double-click the downloaded file. Rainmeter's installer will pop up. Make sure "Load included skins" is checked and hit Install to add this Plex desktop widget to your setup.
Configuration
Once installed, the skin needs to know where your Tautulli server is. Linking your Plex activity to Rainmeter only requires two pieces of info.
Right-click the skin and select Edit Skin, or navigate to @Resources/variables.inc. You need to change these lines:
[Variables]
; ------------------------------------------------------------------------
; CONNECTION
; ------------------------------------------------------------------------
; Base URL to your Tautulli/PlexPy instance.
PlexPyAddress=http://192.168.1.199:8181

; Your Tautulli API key.
; Found in Tautulli Settings -> Web Interface -> API Key
APIKey=8449903058c14827aa54ad4af9d06579
Once you save the file, right-click the skin and hit Refresh.
Customization
I designed this Rainmeter skin to fit any desktop aesthetic. You can control the background color and transparency using RGBA values in the variables file.
Want it fully transparent with just text?
BgColor=0,0,0,1Want a solid "glass" look?
BgColor=25,25,25,200Under the Hood
For the developers interested in how this Plex monitoring skin works: Rainmeter's native WebParser measure is great, but it struggles with dynamic arrays. To get around this, I'm piping the raw JSON response from Tautulli into a Lua script.
The TautulliParse.lua script handles the heavy lifting for this Rainmeter widget:
- JSON Regex: It extracts the
sessionsarray from Tautulli. - Logic: It determines if a stream is Direct Play (Green) or Transcoding (Orange).
- Formatting: It truncates long movie titles and formats millisecond durations into
HH:MM:SS. - Dynamic Bangs: It fires
!SetOptionbangs back to Rainmeter to hide/show rows and resize the background rectangle based on the stream count.
-- Snippet from the sizing logic
if count == 0 then
    bgHeight = 80
elseif count == 1 then
    bgHeight = 120
elseif count > 1 then
    bgHeight = 38 + (count * 65)
end

SKIN:Bang('!SetVariable', 'BgHeight', bgHeight)
This ensures the skin feels "alive" and responsive. If you're looking for a reliable Rainmeter skin for Plex activity, this project is open-source and ready for use!
<terminate_session />